
Welcome To Cyber Aeronautycs Ltd.
SECURING AIR & GROUND INFRASTRUCTURE
MSP for Aerospace & Defense Industries
Managed Services Provider for Mission-Critical Industries.
Stay Cyber Secure !
Get the latest updates on cybersecurity, AI, and tech solutions to protect your business. Subscribe now!
Knowledgebase
CAL Defense is an all-in-one cyber protection solution that integrates data protection with cybersecurity. It provides an innovative combination of:
- Proactive protection, such as vulnerability assessment and patch management; predictive analysis of disk health based on machine learning; malware removal from backups; prevention against reoccurring infections.
- Active protection, such as continuous data protection; protection against ransomware and malware; self-protection.
- Reactive protection, such as full-image and file-level backup and recovery; disaster recovery; instant restore of virtual machines; forensic backups.
Key Features:
Identify
- Auto discovery of new devices
- Vulnerability Assessment
- Data Protection Map
Protect
- Remote Agent Installation
- Backup & Disaster Recovery
- Unified Management Protection Plans
Detect
- Protection against malware and exploits
- Disk Health Forecast
- Dashboards & Reports
Respond
- Patch management integrated with backup
- Malware quarantine
- Rescue with bootable media
Recover
- Backup & disaster recovery
- Forensic information in backups
- Remote Desktop
General information about CAL Defense
With CAL Defense, you can back up and restore Windows and Mac computers, Android smartphones or tablets, as well as iPhones, iPads and iPods. Backups that you can create include the following:
Backups of Windows/macOS Computers:
- Full backups
- Drives
- Volumes
- Folders
- Files
- System states
Mobile Devices:
- Contacts
- Photos
- Videos
- Calendar
- Text messages (Android devices only)
- Reminders (iOS devices only)
When an administrator creates an account for you, an email message is sent to your email address. The message contains the following information:
- An account activation link. Click the link and set the password for the account. Remember your login that is shown on the account activation page.
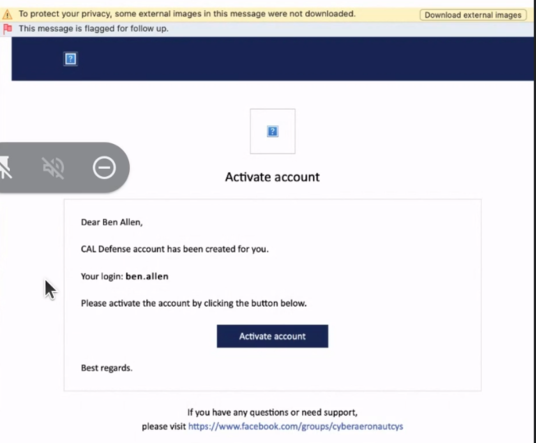
- A link to the Cyber Protect web console login page. Use that link to access the console . Create a long password for your account .

- Setup 2FA . Use Google Authenticator or any other authenticator system to setup 2FA . It will be needed to login .

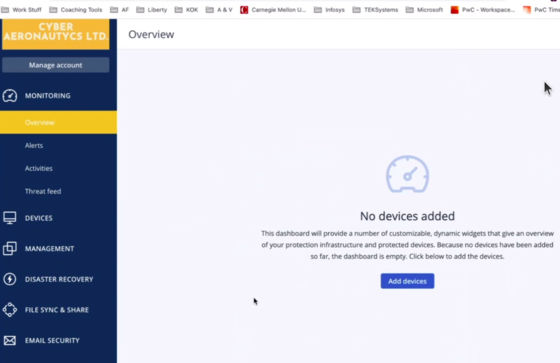
- Click Cyber Protection. On this step , click "Cyber Protection" on Manage Services option .

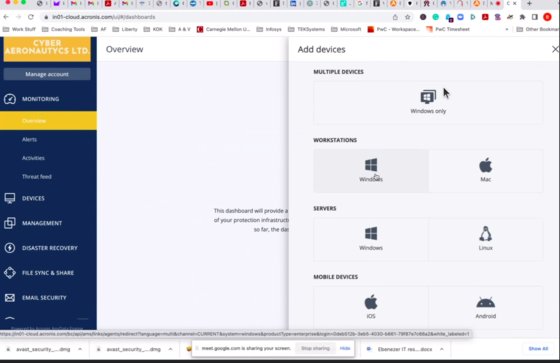
- Click Add Devices. You can click "add devices" from this page or you can go to "Devices" click "Add" on top right
Depending on the machine and data you want to back up, select and download the respective installation file:
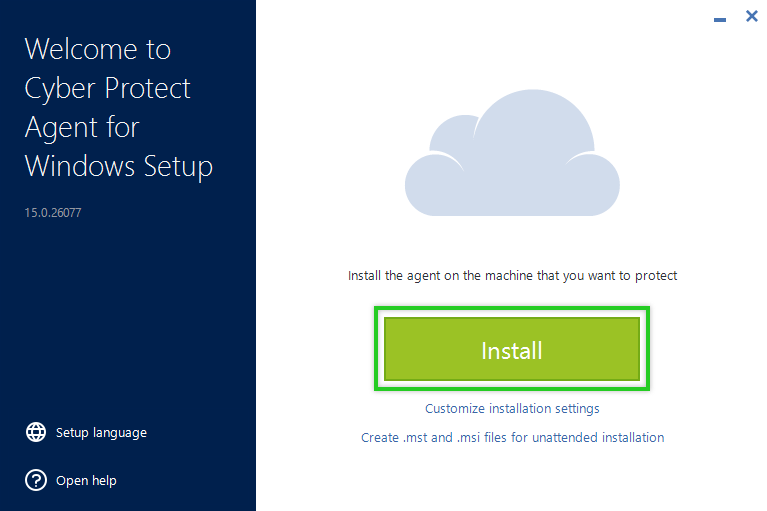
- Download the installation file. Open the folder where the .exe installation file is located and double-click to run it.
- Run the installation file and Click Install. After the installation is complete, you may need to restart your machine to continue with the following steps.
Please Note
- If a machine restart was required, you will need to reopen your browser and follow Steps 1 & 2 again to reopen the Backup Console before proceeding to the next steps.
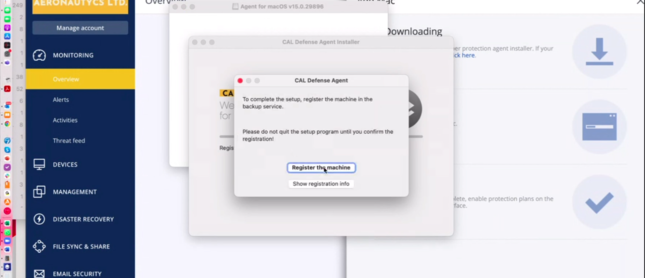
- Click Register the Machine.
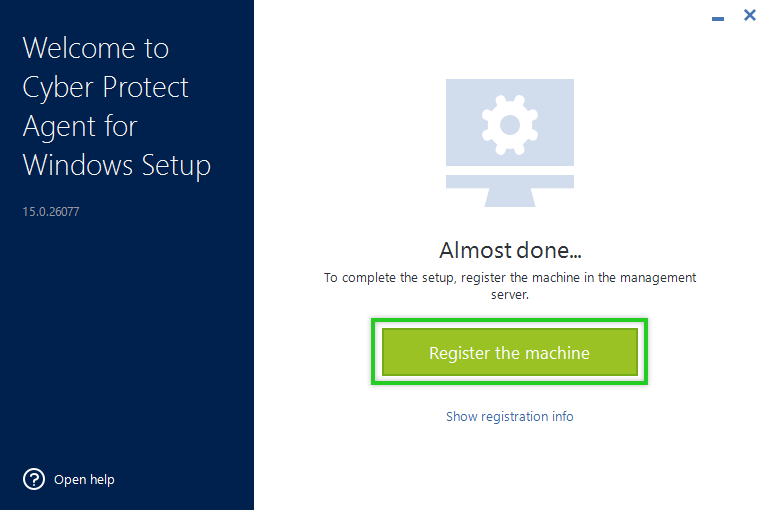
- When the web console opens . Click CONFIRM REGISTRATION.
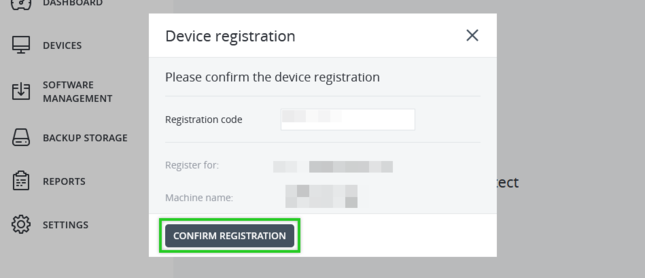
Click OK . Congrats . The agent is successfully installed . You can now create a protection plan which you purchased .
- Download the installation file. Open the folder where the .exe installation file is located and double-click to run it.
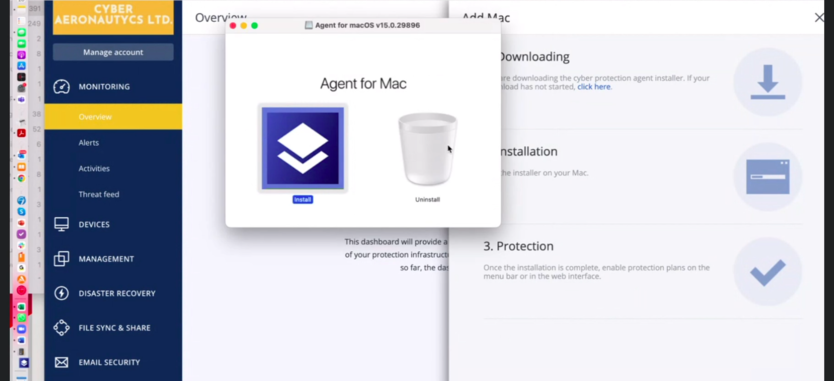
- The Cyber Protect Agent installation file will now be downloaded, and the CAL Defense Agent for macOS window will open. This process may take between a moment to a few minutes depending on your Internet connection. Double-click Install.
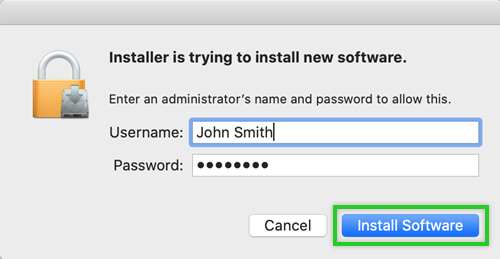
- Enter the username and password of the administrator account and click Install Software.
- The software is installed. Then the Cyber Protect Agent window opens. Click "Register the machine".
- The Backup web console opens . Click "Confirm registration"

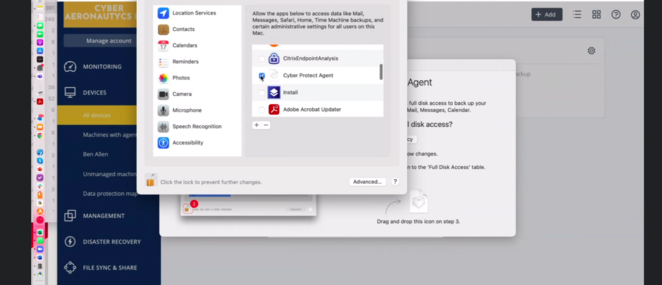
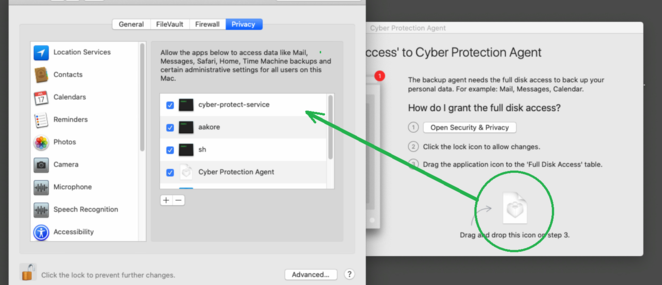
- Optional : If you receive a warning "Grant full Disk Access"
The 'Full Disk Access' permission was not granted to the app. To grant it, go to the 'Utilities' folder in Finder, click 'Cyber Protection Agent Assistant', and then follow the instructions from the app.
Cause : The 'Full Disk Access' permission was not granted to the Cyber Protection agent. Some functionality may not work, for example, quarantine action on detection during real-time protection.
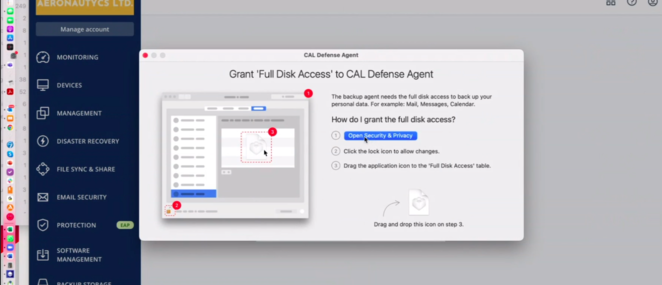
- Solution:
To grant full disk access permissions to Cyber Protection agent:
- Click Open Security&Privacy :
2. Click the "lock" button to allow changes and provide your password when prompted .
3. Drag the application icon from the window requesting to grant Full Disk Access to the Full Disk Access table.
For latest MacOS versions ( e.g. Monterey 12.3.1) - change the secure boot to medium security as newer MacOS versions have very strict 3rd party service filtering
Documentation reference: https://support.apple.com/en-us/HT208198
- In the Cyber Protection console, click All devices > Add.
- Tap Mobile Devices.
- Tap Android/iOS . The Google Play Store or iOS p opens.
- Tap Install.. The Acronis Cyber Backup App is installed.
A protection plan can be applied to multiple machines at the time of its creation, or later. When you create a plan, the system checks the operating system and the device type (for example, workstation, virtual machine, etc.) and shows only those plan modules that are applicable to your devices.
A protection plan can be created in two ways:
- In the Devices section – when you select the device or devices to be protected and then create a plan for them.
- In the Plans section – when you create a plan and then select the machines to be applied to.
Let's consider the first way.
To create the first protection plan
- In the Cyber Protect web console, go to Devices > All devices.
- Select the machines that you want to protect.
- Click Protect, and then click Create plan.You will see the protection plan with the default settings.
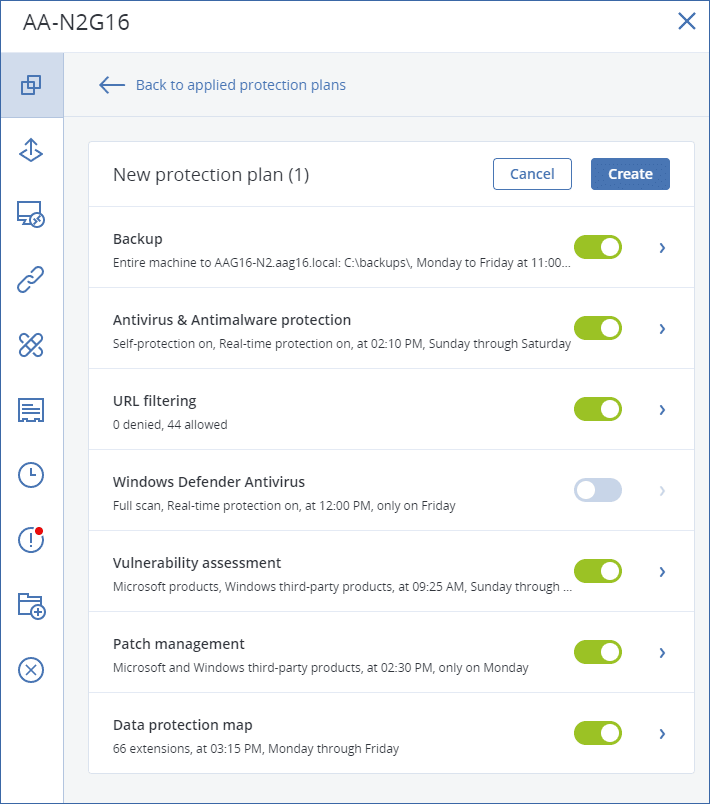
4. [Optional] To modify the protection plan name, click on the pencil icon next to the name.
5. [Optional] To enable or disable a protection plan module, click the switch next to the module name.
6. [Optional] To configure the module parameters, click the corresponding section of the protection plan.
7. When ready, click Create.
The Backup, Antivirus & Antimalware protection, Vulnerability assessment, Patch management, and Data protection map modules can be performed on demand by clicking Run now.
Resolving plan conflicts
A protection plan can be in the following statuses:
- Active – a plan that is assigned to devices and executed on them.
- Inactive – a plan that is assigned to devices but is disabled and not executed on them.
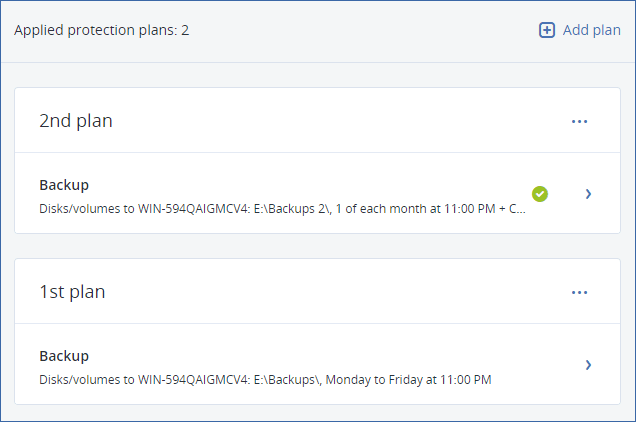
Applying several plans to a device
You can apply several protection plans to a single device. As a result, you will get a combination of different protection plans assigned on a single device. For example, you may apply one plan that has only the Antivirus & Antimalware protection module enabled, and another plan that has only the Backup module enabled. The protection plans can be combined only if they do not have intersecting modules. If the same modules are enabled in more than one protection plan, you must resolve the conflicts between them.
Resolving plan conflicts
Plan conflicts with already applied plans
When you create a new plan on a device or devices with already applied plans that conflict with the new plan, you can resolve a conflict with one of the following ways:
- Create a new plan, apply it, and disable all already applied conflicting plans.
- Create a new plan and disable it.
When you edit a plan on a device or devices with already applied plans that conflict with the changes made, you can resolve a conflict with one of the following ways:
- Save changes to the plan and disable all already applied conflicting plans.
- Save changes to the plan and disable it.
A device plan conflicts with a group plan
If a device is included in a group of devices with an assigned group plan, and you try to assign a new plan to a device, then the system will ask you to resolve the conflict by doing one of the following:
- Remove a device from the group and apply a new plan to the device.
- Apply a new plan to the whole group or edit the current group plan.
License issue
The assigned quota on a device must be appropriate for the protection plan to be performed, updated, or applied. To resolve the license issue, do one of the following:
- Disable the modules that are unsupported by the assigned quota and continue using the protection plan.
- Change the assigned quota manually: go to Devices > <Particular device> > Details > Service quota. Then, revoke the existing quota and assign a new one.
Operations with protection plans
Available actions with a protection plan
You can perform the following actions with a protection plan:
- Rename a plan
- Enable/disable modules and edit each module settings
- Enable/disable a plan
- A disabled plan will not be carried out on the device to which it is applied.
- This action is convenient for administrators who intend to protect the same device with the same plan later. The plan is not revoked from the device and to restore the protection, the administrator must only re-enable the plan.
- Apply a plan to devices or group of devices
- Revoke a plan from a device
- A revoked plan is not applied to a device anymore.
- This action is convenient for administrators who do not need to protect quickly the same device with the same plan again. To restore the protection of a revoked plan, the administrator must know the name of this plan, select it from the list of available plans, and then re-apply it to the desired device.
- Import/export a plan
- You can only import protection plans created in Acronis Cyber Protect 15. Protection plans created in older versions are incompatible with Acronis Cyber Protect 15.
- Delete a plan
To apply an existing protection plan
- Select the machines that you want to protect.
- Click Protect. If a protection plan is already applied to the selected machines, click Add plan.
- The software displays previously created protection plans.
- Select the protection that you need, and then click Apply.
To edit a protection plan
- If you want to edit the protection plan for all machines to which it is applied, select one of these machines. Otherwise, select the machines for which you want to edit the protection plan.
- Click Protect.
- Select the protection plan that you want to edit.
- Click the ellipsis icon next to the protection plan name, and then click Edit.
- To modify the plan parameters, click the corresponding section of the protection plan panel.
- Click Save changes.
- To change the protection plan for all machines to which it is applied, click Apply the changes to this protection plan. Otherwise, click Create a new protection plan only for the selected devices.
To revoke a protection plan from machines
- Select the machines that you want to revoke the protection plan from.
- Click Protect.
- If several protection plans are applied to the machines, select the protection plan that you want to revoke.
- Click the ellipsis icon next to the protection plan name, and then click Revoke.
To delete a protection plan
- Select any machine to which the protection plan that you want to delete is applied.
- Click Protect.
- If several protection plans are applied to the machine, select the protection plan that you want to delete.
- Click the ellipsis icon next to the protection plan name, and then click Delete.
- As a result, the protection plan is revoked from all of the machines and completely removed from the web interface.
Backup
A protection plan with the Backup module enabled is a set of rules that specify how the given data will be protected on a given machine.
A protection plan can be applied to multiple machines at the time of its creation, or later.
To create the first protection plan with the Backup module enabled
- Select the machines that you want to back up.
- Click Protect.
- The software displays protection plans that are applied to the machine. If the machine does not have any plans already assigned to it, then you will see the default protection plan that can be applied. You can adjust the settings as needed and apply this plan or create a new one.
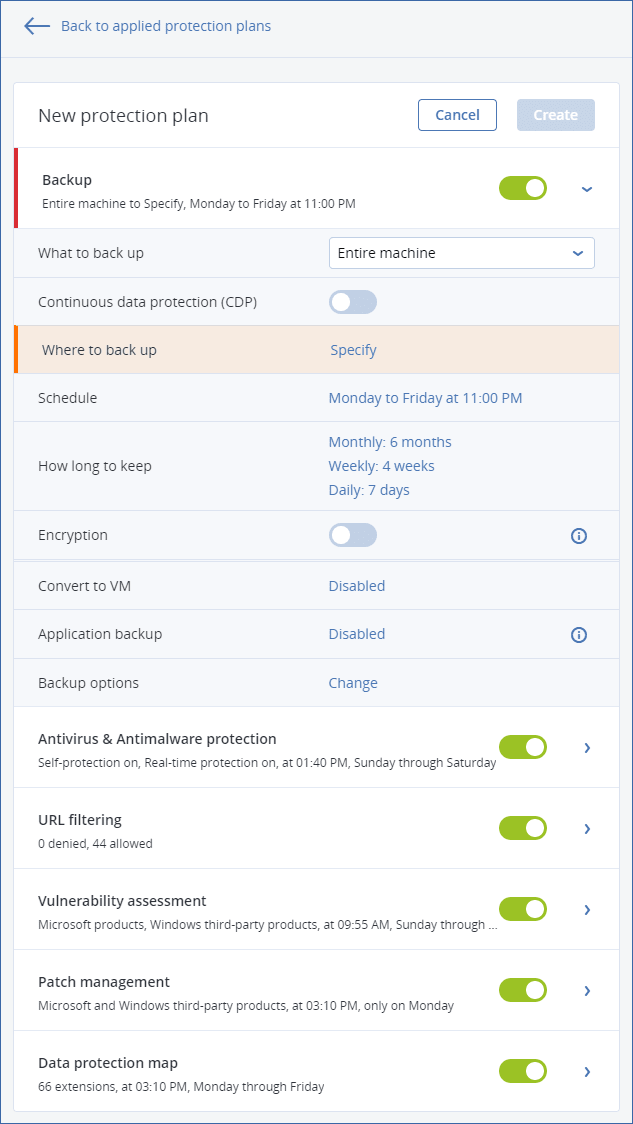
- To create a new plan, click Create plan. Enable the Backup module and unroll the settings.
- [Optional] To modify the protection plan name, click the default name.
- [Optional] To modify the Backup module parameters, click the corresponding section of the protection plan panel.
- [Optional] To modify the backup options, click Change next to Backup options.
- Click Create.
To apply an existing protection plan
- Select the machines that you want to back up.
- Click Protect. If a common protection plan is already applied to the selected machines, click Add plan.
- The software displays previously created protection plans.
- Select a protection plan to apply.
- Click Apply.
Selecting files/folders
File-level backup is available for physical machines and virtual machines backed up by an agent installed in the guest system.
A file-level backup is not sufficient for recovery of the operating system. Choose file backup if you plan to protect only certain data (the current project, for example). This will reduce the backup size, thus saving storage space.
The OneDrive root folder is excluded from backup operations by default. If you select to back up specific OneDrive files and folders, they will be backed up. Files that are not available on the device will have invalid contents in the archive.
There are two ways of selecting files: directly on each machine or by using policy rules. Either method allows you to further refine the selection by setting the file filters.
Direct selection
- In What to back up, select Files/folders.
- Click Items to back up.
- In Select items for backup, select Directly.
- For each of the machines included in the protection plan:
- Click Select files and folders.
- Click Local folder or Network folder.
- The share must be accessible from the selected machine.
- Browse to the required files/folders or enter the path and click the arrow button. If prompted, specify the user name and password for the shared folder.
- Backing up a folder with anonymous access is not supported.
- Select the required files/folders.
- Click Done.
Using policy rules
- In What to back up, select Files/folders.
- Click Items to back up.
- In Select items for backup, select Using policy rules.
- Select any of the predefined rules, type your own rules, or combine both.
- The policy rules will be applied to all of the machines included in the protection plan. If no data meeting at least one of the rules is found on a machine when the backup starts, the backup will fail on that machine.
- Click Done.
Selection rules for Windows
- Full path to a file or folder, for example D:\Work\Text.doc or C:\Windows.
- Templates:
[All Files]selects all files on all volumes of the machine.[All Profiles Folder]selects the folder where all user profiles are located (typically, C:\Users or C:\Documents and Settings).- Environment variables:
%ALLUSERSPROFILE%selects the folder where the common data of all user profiles is located (typically, C:\ProgramData or C:\Documents and Settings\All Users).%PROGRAMFILES%selects the Program Files folder (for example, C:\Program Files).%WINDIR%selects the folder where Windows is located (for example, C:\Windows).- You can use other environment variables or a combination of environment variables and text. For example, to select the Java folder in the Program Files folder, type: %PROGRAMFILES%\Java.
Selection rules for Linux
- Full path to a file or directory. For example, to back up file.txt on the volume /dev/hda3 mounted on /home/usr/docs, specify /dev/hda3/file.txt or /home/usr/docs/file.txt.
/homeselects the home directory of the common users./rootselects the root user's home directory./usrselects the directory for all user-related programs./etcselects the directory for system configuration files.- Templates:
[All Profiles Folder]selects /home. This is the folder where all user profiles are located by default.
Selection rules for macOS
- Full path to a file or directory.
- Templates:
[All Profiles Folder]selects /Users. This is the folder where all user profiles are located by default.
Examples:
- To back up file.txt on your desktop, specify /Users/<username>/Desktop/file.txt, where <username> is your user name.
- To back up all users' home directories, specify /Users.
- To back up the directory where the applications are installed, specify /Applications.
Selecting system state
System state backup is available for machines running Windows 7 and later.
To back up system state, in What to back up, select System state.
A system state backup is comprised of the following files:
- Task scheduler configuration
- VSS Metadata Store
- Performance counter configuration information
- MSSearch Service
- Background Intelligent Transfer Service (BITS)
- The registry
- Windows Management Instrumentation (WMI)
- Component Services Class registration database
Selecting disks/volumes
A disk-level backup contains a copy of a disk or a volume in a packaged form. You can recover individual disks, volumes, or files from a disk-level backup. A backup of an entire machine is a backup of all its non-removable disks.
The OneDrive root folder is excluded from backup operations by default. If you select to back up specific OneDrive files and folders, they will be backed up. Files that are not available on the device will have invalid contents in the archive.
There are two ways of selecting disks/volumes: directly on each machine or by using policy rules. You can exclude files from a disk backup by setting the file filters.
Direct selection
Direct selection is available only for physical machines. To enable direct selection of disks and volumes on a virtual machine, you must install the Cyber Protection agent in its guest operating system.
- In What to back up, select Disks/volumes.
- Click Items to back up.
- In Select items for backup, select Directly.
- For each of the machines included in the protection plan, select the check boxes next to the disks or volumes to back up.
- Click Done.
Using policy rules
- In What to back up, select Disks/volumes.
- Click Items to back up.
- In Select items for backup, select Using policy rules.
- Select any of the predefined rules, type your own rules, or combine both.
- The policy rules will be applied to all of the machines included in the protection plan. If no data meeting at least one of the rules is found on a machine when the backup starts, the backup will fail on that machine.
- Click Done.
Rules for Windows, Linux, and macOS
[All Volumes]selects all volumes on machines running Windows and all mounted volumes on machines running Linux or macOS.
Rules for Windows
- Drive letter (for example C:\) selects the volume with the specified drive letter.
[Fixed Volumes (physical machines)]selects all volumes of physical machines, other than removable media. Fixed volumes include volumes on SCSI, ATAPI, ATA, SSA, SAS, and SATA devices, and on RAID arrays.[BOOT+SYSTEM]selects the boot and system volumes. This combination is the minimal set of data that ensures recovery of the operating system from the backup.[BOOT+SYSTEM DISK (physical machines)]selects all volumes of the disk on which the boot and system volumes are located. If the boot and system volumes are not located on the same disk, nothing will be selected. This rule is applicable only to physical machines.[Disk 1]selects the first disk of the machine, including all volumes on that disk. To select another disk, type the corresponding number.
Rules for Linux
/dev/hda1selects the first volume on the first IDE hard disk./dev/sda1selects the first volume on the first SCSI hard disk./dev/md1selects the first software RAID hard disk.
To select other basic volumes, specify /dev/xdyN, where:
- "x" corresponds to the disk type
- "y" corresponds to the disk number (a for the first disk, b for the second disk, and so on)
- "N" is the volume number.
To select a logical volume, specify its path as it appears after running the ls /dev/mapper command under the root account. For example:
[root@localhost ~]# ls /dev/mapper/
control vg_1-lv1 vg_1-lv2
This output shows two logical volumes, lv1 and lv2, that belong to the volume group vg_1. To back up these volumes, enter:
/dev/mapper/vg_1-lv1
/dev/mapper/vg-l-lv2
Rules for macOS
[Disk 1]Selects the first disk of the machine, including all volumes on that disk. To select another disk, type the corresponding number.
Creating bootable media
Bootable media is a CD, DVD, USB flash drive, or other removable media that enables you to run the agent without the help of an operating system. The main purpose of bootable media is to recover an operating system that cannot start.
We highly recommend that you create and test a bootable media as soon as you start using disk-level backup. Also, it is a good practice to re-create the media after each major update of the protection agent.
You can recover either Windows or Linux by using the same media. To recover macOS, create a separate media on a machine running macOS.
To create bootable media in Windows or Linux
- Download the bootable media ISO file. To download the file, select a machine, and then click Recover > More ways to recover... > Download ISO image.
- [Optional] Copy and print, or write down the registration token displayed by the service console.
- This token allows access to the cloud storage from bootable media without entering a login and password. It is necessary if you do not have a direct login to the cloud, but use third-party authentication instead.
- Do any of the following:
- Burn a CD/DVD using the ISO file.
- Create a bootable USB flash drive by using the ISO file and one of the free tools available online.
- Use ISO to USB or RUFUS if you need to boot an UEFI machine, Win32DiskImager for a BIOS machine. In Linux, using the dd utility makes sense.
- Connect the ISO file as a CD/DVD drive to the virtual machine that you want to recover.
To create bootable media in macOS:
- On a machine where Agent for Mac is installed, click Applications > Rescue Media Builder.
- The software displays the connected removable media. Select the one that you want to make bootable.
- Warning All data on the disk will be erased.
- Click Create.
- Wait while the software creates the bootable media.
Recovering disks by using bootable media
To recover disks by using bootable media
- Boot the target machine by using bootable media.
- [Only when recovering a Mac] If you are recovering APFS-formatted disks/volumes to a non-original machine or to bare metal, re-create the original disk configuration manually:
- Click Disk Utility.
- Erase and format the target disk into APFS. For instructions, refer to https://support.apple.com/en-us/HT208496#erasedisk.
- Re-create the original disk configuration. For instructions, refer to https://support.apple.com/guide/disk-utility/add-erase-or-delete-apfs-volumes-dskua9e6a110/19.0/mac/10.15.
- Click Disk Utility > Quit Disk Utility.
- Click Manage this machine locally or click Rescue Bootable Media twice, depending on the media type you are using.
- If a proxy server is enabled in your network, click Tools > Proxy server, and then specify the proxy server host name/IP address, port, and credentials. Otherwise, skip this step.
- [Optional] When recovering Windows or Linux, click Tools > Register media in the Cyber Protection service, and then specify the registration token that you obtained when downloading the media. If you do this, you will not need to enter credentials or a registration code to access the cloud storage, as described in step 8.
- On the welcome screen, click Recover.
- Click Select data, and then click Browse.
- Specify the backup location:
- To recover from cloud storage, select Cloud storage. Enter the credentials of the account to which the backed up machine is assigned.
- When recovering Windows or Linux, you have the option to request a registration code and use it instead of the credentials. Click Use registration code > Request the code. The software shows the registration link and the registration code. You can copy them and perform the registration steps on a different machine. The registration code is valid for one hour.
- To recover from a local or a network folder, browse to the folder under Local folders or Network folders.
- Click OK to confirm your selection.
- Select the backup from which you want to recover the data. If prompted, type the password for the backup.
- In Backup contents, select the disks that you want to recover. Click OK to confirm your selection.
- Under Where to recover, the software automatically maps the selected disks to the target disks.
- If the mapping is not successful or if you are unsatisfied with the mapping result, you can re-map disks manually.
- Changing disk layout may affect the operating system bootability. Please use the original machine's disk layout unless you feel fully confident of success.
- [When recovering Linux] If the backed-up machine had logical volumes (LVM) and you want to reproduce the original LVM structure:
- Ensure that the number of the target machine disks and each disk capacity are equal to or exceed those of the original machine, and then click Apply RAID/LVM.
- Review the volume structure, and then click Apply RAID/LVM to create it.
- [Optional] Click Recovery options to specify additional settings.
- Click OK to start the recovery.
Recovering files by using bootable media
To recover files by using bootable media
- Boot the target machine by using the bootable media.
- Click Manage this machine locally or click Rescue Bootable Media twice, depending on the media type you are using.
- If a proxy server is enabled in your network, click Tools > Proxy server, and then specify the proxy server host name/IP address, port, and credentials. Otherwise, skip this step.
- [Optional] When recovering Windows or Linux, click Tools > Register media in the Cyber Protection service, and then specify the registration token that you obtained when downloading the media. If you do this, you will not need to enter credentials or a registration code to access the cloud storage, as described in step 7.
- On the welcome screen, click Recover.
- Click Select data, and then click Browse.
- Specify the backup location:
- To recover from cloud storage, select Cloud storage. Enter the credentials of the account to which the backed up machine is assigned.
- When recovering Windows or Linux, you have the option to request a registration code and use it instead of the credentials. Click Use registration code > Request the code. The software shows the registration link and the registration code. You can copy them and perform the registration steps on a different machine. The registration code is valid for one hour.
- To recover from a local or a network folder, browse to the folder under Local folders or Network folders.
- Click OK to confirm your selection.
- Select the backup from which you want to recover the data. If prompted, type the password for the backup.
- In Backup contents, select Folders/files.
- Select the data that you want to recover. Click OK to confirm your selection.
- Under Where to recover, specify a folder. Optionally, you can prohibit overwriting of newer versions of files or exclude some files from recovery.
- [Optional] Click Recovery options to specify additional settings.
- Click OK to start the recovery.
Safe recovery
A backed-up OS image can have malware that can reinfect a machine after recovery.
The safe recovery functionality allows you to prevent recurrence of infections by using the integrated antimalware scanning and malware deletion during the recovery process.
Limitations:
- Safe recovery is supported only for physical or virtual Windows machines with Agent for Windows installed inside the machine.
- The supported backup types are "Entire machine" or "Disks/volumes" backups.
- Safe recovery is supported only for the volumes with NTFS file system. Non-NTFS partitions will be recovered without anti-malware scanning.
- Safe recovery is not supported for CDP backups. The machine will be recovered based on the last regular backup without the data in the CDP backup. To recover the CDP data, start a Files/folders recovery.
How it works
If you enable the Safe recovery option during the recovery process, then the system will perform the following:
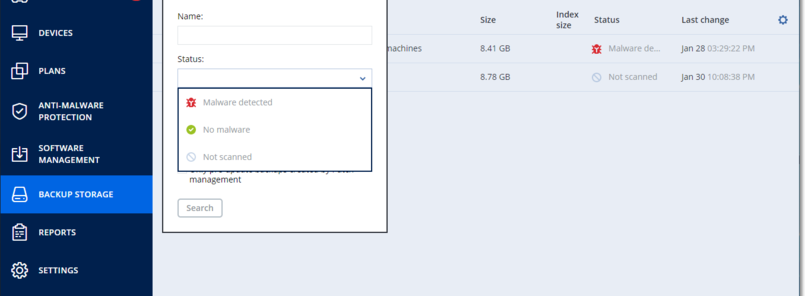
- Scan the image backup for malware and mark the infected files. One of the following statuses is assigned to a backup:
- No malware – no malware was found in a backup during scanning.
- Malware detected – malware was found in a backup during scanning.
- Not scanned – backup was not scanned for malware.
- Recover the backup to the selected machine.
- Delete the detected malware.
- You can filter backups by using the Status parameter.
Creating bootable media
Bootable media is a CD, DVD, USB flash drive, or other removable media that enables you to run the agent without the help of an operating system. The main purpose of bootable media is to recover an operating system that cannot start.
We highly recommend that you create and test a bootable media as soon as you start using disk-level backup. Also, it is a good practice to re-create the media after each major update of the protection agent.
You can recover either Windows or Linux by using the same media. To recover macOS, create a separate media on a machine running macOS.
To create bootable media in Windows or Linux
- Download the bootable media ISO file. To download the file, click the account icon in the top-right corner > Downloads > Bootable media.
- Do any of the following:
- Burn a CD/DVD using the ISO file.
- Create a bootable USB flash drive by using the ISO file and one of the free tools available online.
- Use ISO to USB or RUFUS if you need to boot an UEFI machine, Win32DiskImager for a BIOS machine. In Linux, using the dd utility makes sense.
- Connect the ISO file as a CD/DVD drive to the virtual machine that you want to recover.
Alternatively, you can create bootable media by using Bootable Media Builder.
To create bootable media in macOS
- On a machine where Agent for Mac is installed, click Applications > Rescue Media Builder.
- The software displays the connected removable media. Select the one that you want to make bootable.
- All data on the disk will be erased.
- Click Create.
- Wait while the software creates the bootable media.
Remote access (RDP and HTML5 clients)
Cyber Protect provides you with remote access capability. You can remotely connect and manage your user machines right from the web console. This allows you to easily assist to your users in resolving issues on their machines.
Prerequisites:
- A protection agent is installed on the remote machine and is registered on the management server.
- The machine has an appropriate Cyber Protect license assigned.
- The Remote Desktop Connection сlient is installed on the machine from which the connection is initialized.
- The machine from which the RDP connection is initialized must be able to access the management server by the its host name. The DNS settings must be configured properly or the management server host name must be put in the hosts file.
A remote connection can be established from both Windows and macOS machines.
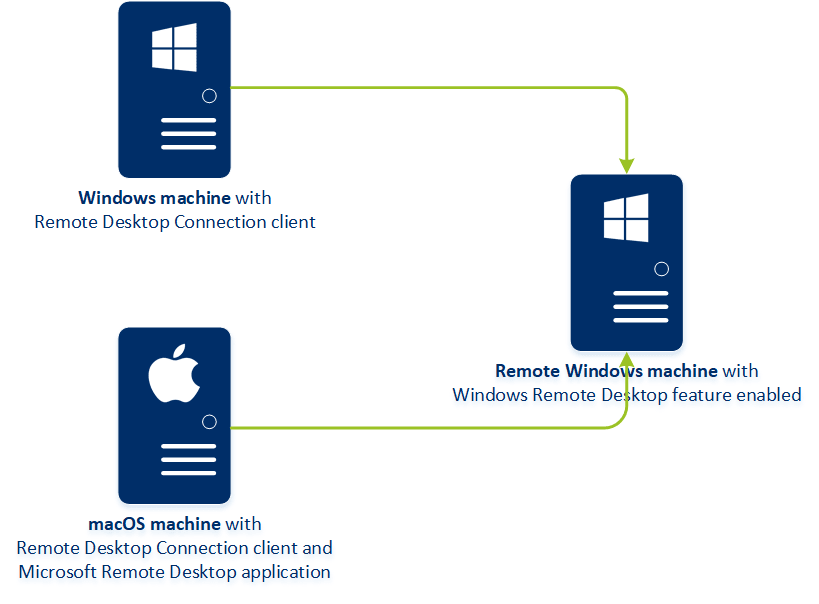
The remote access functionality can be used for connections to Windows machines with the Windows Remote Desktop feature available. That is why a remote access is not possible, for example, to a Windows 10 Home or macOS systems.
To establish a connection from a macOS machine to a remote machine, ensure that the following applications are installed on the macOS machine:
- The Remote Desktop Connection сlient
- The Microsoft Remote Desktop application
How it works
When you try to connect to a remote machine, the system first checks whether this machine has a Cyber Protect license. Then, the system checks whether the connection via the HTML5 or RDP client is possible. You initiate a connection via the RDP or HTML5 client. The system establishes a tunnel to the remote machine and checks whether the remote desktop connections are enabled on the remote machine. Then, you enter the credentials and, after their validation, you can access the remote machine.

How to connect to a remote machine
To connect to a remote machine, do the following:
- In the Cyber Protect web console, go to Devices > All devices.
- Click on the machine to which you want to connect remotely and then click Cyber Protection Desktop > Connect via RDP client or Connect via HTML5 client.
- Connection via HTML5 client is only available if the management server is installed on a Linux machine.
- [Optional, only for connection via RDP client] Download and install the Remote Desktop Connection client. Initiate the connection to the remote machine.
- Specify the login and password to access the remote machine, and then click Connect.
As a result, you are connected to the remote machine and can manage it.
Sharing a remote connection
Employees who are working from home may need access to their office computers, but it is possible that your organization may not have a configured VPN or other tools for remote connection. Cyber Protect provides you with the capability to share an RDP link with your users, thus providing them with remote access to their machines.
To enable the sharing remote connection functionality
- In the Cyber Protect web console, go to Settings > Protection > Remote connection.
- Select the check box Share remote desktop connection.
As a result, when you select a device in Cyber Protect web console, a new option Share remote connection will appear.
To share a remote connection with your users
- In the Cyber Protect web console, go to Devices > All devices.
- Select the device to which you want provide a remote connection.
- Click Share remote connection.
- Click Get link. In the opened window, copy the generated link. This link can be shared with a user who needs a remote access to the device. The link is valid for 10 hours.
After getting the link, you can share it via email or other means of communication. The user with whom the link was shared, must click it and then select the connection type:
- Connect via RDP client.
- This connection will prompt for downloading and installing the Remote Connection client.
- Connect via HTML5 client.
- This connection does not require installation of any RDP client on the user machine. The user will be redirected to a login screen and must enter the credentials for accessing the machine.
Remote wipe
Remote wipe allows a Cyber Protect service administrator and a machine owner to delete the data on a managed machine – for example, if it gets lost or stolen. Thus, any unauthorized access to sensitive information will be prevented.
Remote wipe is only available for machines running Windows 10. To receive the wipe command, the machine must be turned on and connected to the Internet.
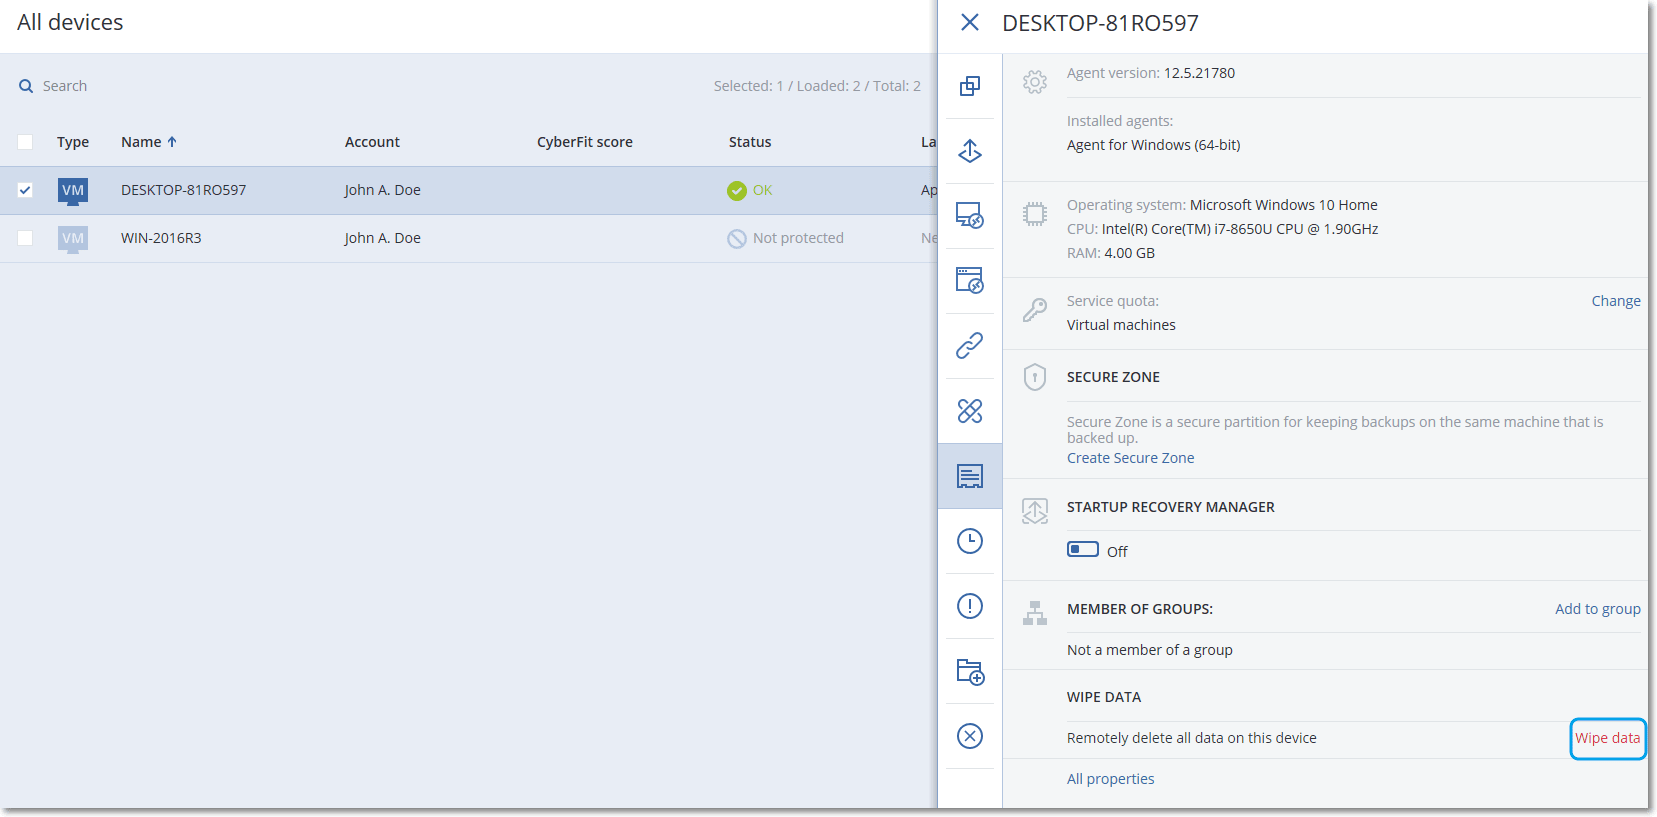
To wipe data from a machine
- In the Cyber Protect web console, go to Devices > All devices.
- Select the machine whose data you want to wipe.
- You can wipe data from one machine at a time.
- Click Details, and then click Wipe data.
- If the machine that you selected is offline, the Wipe data option is inaccessible.
- Confirm your choice.
- Enter the credentials of this machine's local administrator, and then click Wipe data.
- You can check the details about the wiping process and who started it in Dashboard > Activities.
Troubleshooting
Operating Systems: Windows , Linux
Last update: Sep 07, 2022
In general, performance is constantly being optimized, so updating to the latest build is always recommended for the best performance of backup and other operations.
First of all, please check out the general system requirements, described in your product documentation, to make sure that the hardware usage in your particular scenario is actually outside the normal operating parameters of our product.
To investigate the issue with CAL Support, please collect the following diagnostic information:
- Clarify the exact circumstances when this issue is reproduced. Pay special attention if this happens before/during/after a specific operation or setting enabled or if this is something that becomes apparent over time after many operations. In the second case, note how long it takes for the issue to be reproduced.
- If this happens during a specific operation, please collect details on the configuration of this task:
- details of the protection plan
- log of the operation
- information about the backup and its location (type, size, archive type (legacy version 11 or newer version 12), physical location, number of archives and backups in the vault)
- scope of the issue, for example, if this happens during disk backup, would a smaller file backup or backup to another location cause similar issues; or if restore performance is poor, does it reproduces with bootable media as well.
- If this happens while a certain setting is enabled, for example Antivirus & Antimalware protection service is enabled, please collect details on the configuration of the service causing spikes in hardware usage.
- Collect a dump of the process facing resource issues while the problem is reproduced. Do this in exactly the same way you would collect a dump of a hanging process.
- For Windows, please collect a Process monitor log while the issue is reproduced (run for 1-2 minutes). See Collecting Process Monitor Log.
- For Linux systems, please collect an strace log: CAL Linux Products: Collecting Strace Output of CAL Defense Services in Linux.
- For Virtual Appliance:
- CPU usage:
- - Connect to ESX(i) host/vCenter via vSphere Infrastructure Client and click on the installed and running Virtual Appliance.
- - Go to Console tab (the GUI of the Virtual Appliance) and press CTRL-SHIFT-ALT-SPACE-F1 and then ALT-F2.
- - Run "top" command and create a screenshot of the output;
- Performance logs from VMware ESX(i) host where the VA is running using the steps described in the respective article in VMware Knowledge Base. Pay attention on the step 8 to enable capturing the performance data.
Alert 1 – Windows defender is blocked by a third-party antivirus software: Windows defender is blocked because CAL Defense is installed on machine
In this case, both Windows defender and CAL real-time protection are enabled. It is not possible to run two antiviruses in one machine as they will conflict with each other.
Solution: if you want to use CAL Defense in full capacity, disable Windows Defender antivirus in the protection plan for that device.
Alert 2 – Windows defender is blocked by a third-party antivirus software: Windows defender is blocked because any third-party antivirus and CAL Defense is installed on the machine

In this case – A third-party antivirus is running on the machine(e.g. – Kaspersky antivirus) and both CAL real-time protection and Windows Defender antivirus are enabled in the protection plan. It is not possible to use multiple security products in one machine.
Solution 1: If you want to use third-party antivirus (e.g. Kaspersky) then please disable CAL Defense real-time protection, URL filtering and Windows Defender antivirus in the protection plan.
Solution 2: If you want to use CAL Defense real-time protection then you need to uninstall third-party antivirus from the system and disable Windows Defender antivirus from the device protection plan.
Alert 3 – Detected a conflict with a security product. Real-time Antimalware protection was not enabled because it conflicts with another security solution <name> installed on machine <machine_name>

What this means: CAL Defense real-time protection is enabled in the protection plan and a third-party antivirus is installed on the machine.
Solution 1: If you want to use CAL Defense real-time protection then uninstall third-party antivirus on the machine.
Solution 2: If you want to use the third-party antivirus, disable CAL Defense real-time protection, URL filtering and Windows defender antivirus in the protection plan.
Important note
It is not necessary to completely disable antivirus and antimalware protection module in machine’s protection plan: disabling CAL Defense real-time protection is enough.


Symptoms
You have an antivirus or a different security solution in place and you want to install CAL Defense
OR
After CAL Defense is installed on a machine with a different security solution in place, the machine displays significant performance degradation, such as programs not running or running slowly, unexpected reboots, slow booting, etc
Cause
Two or more antivirus solutions are active on the same machine.
If more than one such program is running, there are a number of ways in which they can interfere with each other:
- Antivirus and antispyware programs usually integrate deep in the system to be able to detect threats even on kernel level; as such they will attempt to install monitors in the same part of system kernel, resulting in conflicts
- Performing the antivirus scan consumes a considerable amount of system resources, running two scans at the same time is prone to completely overload the system.
- If a threat is detected, each antivirus will attempt to disarm it in its own way, triggering a collision between the two programs. This can result in either false alarms or worst case, system overload by simultaneous efforts from both programs.
Solution
CAL Defense integrates with Windows Security Center to monitor the status of Real-time protection, the relevance of Protection updates, and product license status. If a different antivirus is set in Windows Security Center as Virus & Threat protection then the real-time protection module of CAL Defense will be deactivated automatically. That ensures that we will not initiate any conflict between two simultaneously running antivirus solutions. To eliminate any possibility of that conflict from the other antivirus part, we recommend that you leave only CAL Defense and uninstall the third-party antivirus.
In case the other antivirus solution is not detected by Windows Security Center, then CAL Defense and the other antivirus will conflict over resources. In this case, we recommend to deactivate either CAL Defense real-time protection module or deactivate/uninstall the other antivirus solution.
On Windows 7, Windows Security Center may incorrectly report the information about third-party antivirus software. If you use Windows 7, please manually deactivate real-time protection either in CAL Defense or in the other security solution, to avoid conflicts.
To deactivate antimalware protection in CAL Defense, go to Protection section, and click Turn off protection, then select for how long the protection should be disabled:
More information
On Windows 8 and newer, web filtering can be used independently of installed third-party anti-malware solutions.
Membership


© Copyright 2025 . All Rights Reserved. Cyber Aeronautycs Ltd .
Registered in Bangladesh . Company Registration Number C-172611.
Trade License No: TRAD/DNCC/066727/2022
DBID No.